Tapes / Specialist Tapes / Line Marking - Hazard Tape
-
50mmx33m - Yellow & Black Line Marking TapeRegular price From £2.39 GBPRegular priceUnit price per
-
50mmx33m - Social Distancing Tape - Keep a Safe Distance of 2m - Yellow/BlackRegular price From £3.14 GBPRegular priceUnit price per
-
70mmx500m - Non-Stick Yellow & Black Barrier TapeRegular price From £8.33 GBPRegular priceUnit price per
-
70mmx500m - Non-Stick Red & White Barrier TapeRegular price From £12.29 GBPRegular priceUnit price per
-
50mmx30m - Yellow & Black Line Marking TapeRegular price From £3.51 GBPRegular priceUnit price per
-
50mmx30m - Yellow Line Marking TapeRegular price From £3.38 GBPRegular priceUnit price per
-
50mmx30m - White Line Marking TapeRegular price From £4.97 GBPRegular priceUnit price per
-
50mmx30m - Red & White Line Marking TapeRegular price From £3.62 GBPRegular priceUnit price per
-
50mmx30m - Red Line Marking TapeRegular price From £4.97 GBPRegular priceUnit price per
-
50mmx30m - Green Line Marking TapeRegular price From £4.97 GBPRegular priceUnit price per
-
50mmx30m - Blue Line Marking TapeRegular price From £4.97 GBPRegular priceUnit price per


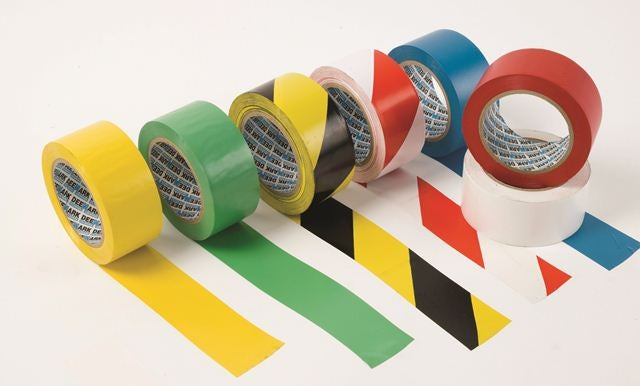
Heavy duty PVC floor marking tape in solid or striped colours.
Convenient way to mark out aisles, lines, hazard areas and tools.
Easily applied with a dispenser and is cleaner to apply than paint.
- Long lasting
- Choice of colours
| Order Code | Size W x L | Colour | Pack Quantity |
| 13ALR | 50mm x 33m | Red | 24 |
| 13ALY | 50mm x 33m | Yellow | 24 |
| 13ALB | 50mm x 33m | Blue | 24 |
| 13ALG | 50mm x 33m | Green | 24 |
| 13ALW | 50mm x 33m | White | 24 |
| 13ALYB | 50mm x 33m | Yellow/Black | 24 |
| 13ALRW | 50mm x 33m | Red/White | 24 |
| Order Code | Description |
| 13D50LM |
Line marking tape dispenser |
Tapes / Specialist Tapes / Line Marking - Hazard Tape
Heavy Duty PVC Floor Marking & Hazard Tape
Floor marking tape is a practical way to create clear, durable visual guidance on floors without the mess, drying time, or disruption associated with paint. In warehouses, factories, workshops, and back-of-house retail areas, line marking helps separate pedestrian walkways from vehicle routes, define storage bays, highlight hazards, and support consistent housekeeping standards. This collection focuses on heavy duty PVC floor marking tape in solid colours and high-visibility striped options, designed for fast application with a tape dispenser and straightforward maintenance.
Because floor tape is applied directly to the walking/traffic surface, performance depends on choosing the right tape type, preparing the floor correctly, and applying it with good technique. The sections below explain common tape styles, where each is typically used, and how to get the best service life from your markings.
Line Marking & Hazard Tape — Helpful Guide
This category includes heavy duty PVC floor marking tape in a standard, easy-to-handle format (50mm wide x 33m long). The range includes solid colours for zoning and organisation, plus striped hazard patterns for warning and restricted areas.
1) Solid colour PVC floor marking tape (zoning, aisles, bays, routes)
Solid colours are commonly used to create consistent “rules” across a site—such as defining pedestrian lanes, forklift routes, staging areas, quarantine zones, or work cells. A single colour can also be used to indicate direction of travel, keep-out boundaries around machinery, or to outline equipment footprints so items are returned to the correct location.
- 13ALR — 50mm x 33m, Red. Often used for stop points, restricted areas, or to highlight critical boundaries where attention is needed.
- 13ALY — 50mm x 33m, Yellow. Commonly used for general caution zones, aisle edges, and high-visibility guidance lines.
- 13ALB — 50mm x 33m, Blue. Frequently used for process areas, work-in-progress zones, or to distinguish specific operational lanes.
- 13ALG — 50mm x 33m, Green. Often used for safe routes, first-aid related zones, or areas associated with safety equipment (site conventions vary).
- 13ALW — 50mm x 33m, White. Commonly used for general layout lines, bay outlines, and clean, high-contrast markings on darker floors.
2) Striped hazard floor marking tape (warning, hazards, keep-clear)
Striped tapes are used where you want an immediate visual warning. They are typically applied around hazards (low headroom, pinch points, trip edges), at the perimeter of restricted zones, or to mark “keep clear” areas in front of electrical panels, fire equipment, or emergency exits. Stripes can also be used to highlight temporary hazards during maintenance or reconfiguration.
- 13ALYB — 50mm x 33m, Yellow/Black. A classic hazard pattern used to draw attention to caution areas and physical hazards.
- 13ALRW — 50mm x 33m, Red/White. Often used to indicate restricted access, no-entry boundaries, or areas requiring special authorisation.
Case Study: Improving Warehouse Flow With Simple Floor Marking
A mid-sized warehouse receiving mixed pallets was experiencing frequent congestion at the goods-in area. Pedestrians were crossing forklift routes to reach picking aisles, and staging pallets were being placed inconsistently, narrowing travel lanes. The site introduced a simple floor marking plan using solid colour tape for lanes and bays, and striped hazard tape for keep-clear zones.
- Step 1 — Define travel lanes: A continuous solid line was applied to create a dedicated pedestrian walkway from the entrance to the picking aisles, reducing ad-hoc crossings.
- Step 2 — Standardise staging: Rectangular bay outlines were taped for inbound staging and quality-check holding, making it obvious where pallets should be placed.
- Step 3 — Protect critical areas: Striped hazard tape was used to mark keep-clear zones in front of electrical cabinets and fire points, preventing accidental obstruction.
- Step 4 — Maintain and audit: A quick weekly walk-through identified damaged sections early so short lengths could be replaced before markings became unclear.
The result was clearer traffic separation, fewer blocked access points, and faster onboarding for new staff because the floor layout communicated expectations visually.
How to Choose the Correct Floor Marking Tape
Start with the purpose of the marking
- General layout and organisation: Choose a solid colour that fits your site’s zoning rules (for example, one colour for pedestrian routes and another for storage bays).
- Hazards and restricted areas: Choose a striped hazard pattern where you need immediate attention and a clear warning boundary.
Consider the floor surface and environment
Floor tape performs best on clean, dry, smooth, even surfaces. Dust, oil, moisture, and rough or crumbling substrates reduce adhesion and shorten service life. If your floor is sealed concrete, painted, or smooth resin, tape typically bonds more reliably than on porous, dusty, or heavily textured concrete.
- Traffic level: Higher forklift traffic and tight turning increases edge wear. In these areas, keep lines straight where possible and avoid placing tape directly in pivot points.
- Cleaning regime: Frequent scrubbing and aggressive chemicals can lift edges over time. Choose line locations that minimise direct brush impact and ensure the tape is fully bonded before wet cleaning.
- Temperature: Very cold floors can reduce initial tack. Applying in moderate conditions and allowing time for the adhesive to wet-out improves bond strength.
Pick a practical width and layout
This collection uses a 50mm width, which is a common choice because it is visible without being overly intrusive. For complex layouts, you can combine straight runs for lanes with short segments to create corners, arrows, or boxed outlines. Keeping a consistent spacing and using a simple site map helps maintain a professional, easy-to-follow system.
Best Practices: Surface Preparation & Application
1) Prepare the surface properly
Adhesive tapes rely on intimate contact with the floor. Before applying, remove dust and debris, then clean away oil/grease and allow the surface to dry fully. If the floor has old tape residue, remove it so the new tape sits flat and bonds evenly.
- Sweep and vacuum to remove fine dust that can act like a release layer.
- Degrease where needed (especially near loading bays, packing benches, and maintenance areas).
- Ensure the floor is dry; moisture trapped under tape can cause lifting.
2) Apply with steady tension and firm pressure
For long straight lines, a dispenser helps keep the tape aligned and reduces wrinkles. Apply gradually, pressing down firmly as you go to avoid air bubbles. Pay extra attention to the first and last 100–200mm of each run, as ends are most likely to catch under traffic or cleaning equipment.
- Lay short sections first when creating corners or boxed bays.
- Use consistent pressure along the full width to seat the adhesive.
- After application, run a roller or firm hand pressure along the tape to improve contact.
3) Allow time before heavy traffic
Even when tape feels secure immediately, adhesives typically build bond strength over time. Where possible, apply markings during quieter periods and allow a settling period before heavy forklift traffic or wet cleaning. This helps reduce early edge lift and improves overall durability.
Design Tips for Clear, Consistent Markings
Use a simple “visual language”
Floor marking works best when everyone understands what each colour means. Keep the number of colours limited, document the meaning of each, and apply consistently across the site. If you operate multiple areas (goods-in, storage, picking, packing), use the same rules everywhere to reduce confusion.
Make intersections and crossings obvious
Where pedestrian routes cross vehicle lanes, consider using short, repeated segments (a “ladder” effect) or boxed crossing zones to draw attention. Keep crossings to a minimum and place them where sight lines are good.
Mark keep-clear zones with intent
Striped hazard tape is most effective when it clearly communicates “do not store here” or “hazard boundary.” Use it around emergency equipment, electrical panels, and door swing areas. Keep the boundary large enough to remain functional even when pallets or bins are nearby.
Maintenance, Repair, and Removal
Routine inspection
High-traffic areas should be checked regularly for edge lift, cuts, or abrasion. Replacing short damaged sections early is usually faster and cleaner than waiting until the marking fails completely. Keeping spare rolls in the same colours helps maintain consistency.
Cleaning around floor tape
Most facilities can continue normal sweeping and mopping, but aggressive scrubbing directly against tape edges can shorten life. If you use mechanical scrubbers, ensure brushes are not catching tape ends and avoid directing high-pressure water jets at edges.
Removing old tape
When layouts change, remove tape carefully to avoid tearing and to minimise residue. Lifting a corner and pulling back slowly at a low angle often helps. If adhesive remains, use a compatible adhesive remover or degreaser suitable for your floor finish, then allow the surface to dry before re-taping.
Common Applications
- Aisle definition: Create clear travel lanes and storage aisles to reduce congestion and improve picking efficiency.
- Pedestrian walkways: Separate foot traffic from vehicles and define safe routes through operational areas.
- Staging and quarantine bays: Outline inbound, outbound, returns, or inspection zones so pallets and totes are placed consistently.
- Hazard boundaries: Highlight trip edges, low-clearance areas, or machinery zones where extra caution is required.
- Keep-clear zones: Protect access to emergency exits, fire points, electrical panels, and first-aid equipment.
Q&A
What’s the difference between solid colour floor marking tape and striped hazard tape?
Solid colour tape is typically used for organisation—defining lanes, bays, and work areas. Striped hazard tape is used to draw attention to risk or restriction, such as hazards, keep-clear zones, or boundaries where extra caution is required.
What floor surfaces does PVC floor marking tape adhere to best?
It generally adheres best to clean, dry, smooth, even surfaces such as sealed concrete, painted floors, and many resin-coated floors. Dusty, oily, damp, or heavily textured surfaces reduce contact area and can cause early lifting or edge wear.
How do I apply floor marking tape so it lasts longer in high-traffic areas?
Clean and dry the floor thoroughly, apply the tape in straight runs with firm pressure, and pay special attention to the ends and edges. Where possible, avoid placing tape in tight forklift turning points and allow time before heavy traffic or wet cleaning.
Can I use a tape dispenser for these rolls, and why does it help?
Yes—dispensers help keep long lines straight, maintain steady tension, and reduce wrinkles or bubbles. They also speed up installation and improve consistency across large areas, which is especially useful when marking aisles, walkways, and bay outlines.
How do I remove old floor tape and prepare the area for new markings?
Lift a corner and pull back slowly at a low angle to reduce tearing. Remove any remaining adhesive with a floor-finish-compatible adhesive remover or degreaser, then clean and let the surface dry fully before applying new tape for reliable adhesion.